×

Subscribe to our newsletter!

Get 5% off your next order by signing up.

Self-leveling pedestal 155 245 mm for slabs, tiles or ceramics - Jouplast
  • Self-leveling pedestal 155 245 mm for slabs, tiles or ceramics - Jouplast
  • Self-leveling pedestal 155 245 mm for slabs, tiles or ceramics - Jouplast
  • Self-leveling pedestal 155 245 mm for slabs, tiles or ceramics - Jouplast
  • Self-leveling paving terrace pedestal 155/245 mm - ESSENTIEL range - Jouplast

Self-leveling paving terrace pedestal 155/245 mm - ESSENTIEL range - Jouplast

JOU-IH155245DSN0000
JOUPLAST
 

Expédition des commandes en 24/48h


Livraison offerte dès 500€


Paiement en 3 ou 4x avec Oney


Service client du lundi au vendredi

Meilleur prix garanti
€5.50
Tax included
Available stock
1757 Items
Packaging
Quantity

Calculate quantities
You might also like
Description
Dessin technique du plot dalle autonivelant Jouplast Essentiel 155/245 mm

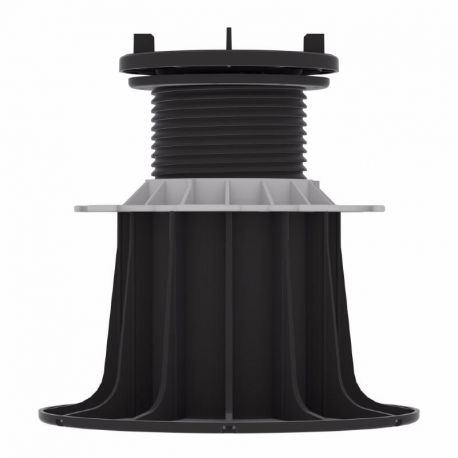
Jouplast Essentiel self-leveling pedestal from 155 to 245 mm for tiled terrace

Pedestal adjustable in height from 155 to 245 mm for the creation of a paving terrace for pedestrian use. This self-leveling pedestal is ideal for uneven or irregular grounds and can compensate for or create a slope of up to 5% over 1 meter, regardless of the nature of the floor. The self-leveling paving terrace pedestal allows you to create the foundations of terraces in outdoor tiles, porcelain stoneware, concrete pavings or wooden gratings.

The advantages of Jouplast's 155/245 mm self-leveling paving terrace pedestal

  • Speed and ease of installation
  • Laying on uneven or irregular ground
  • Allows you to compensate or create a slope of up to 5% thanks to its head mounted on a pivot
  • Installation without fixing or joint
  • Has 4 breakable 3 mm thick spacers to facilitate installation
  • Manual and precise height adjustment thanks to the gray nut

Tips for laying a tiled terrace on pedestals

  • Tips for laying a tiled terrace on pedestals
  • A paving terrace on self-leveling pedestal is intended for outdoor and pedestrian use
  • This Jouplast self-leveling pedestal can only be used on uneven, irregular ground such as crushed gravel.
  • Nevertheless, the ground must be prepared. If this is not the case, it may change over time and your paving terrace on pedestals may move depending on weight and weather conditions. To guarantee the durability of your terrace over time, stabilize your ground by preparing the ground;
  • Regardless of the support, plan an inclination of 1 cm per linear meter to allow the evacuation of rainwater;
  • Lay self-supporting pavings, class T7 or T11 according to standard NF EN 1339 or F+;
  • Bring a paving carrier to facilitate movement and avoid hurting your back.

Steps for laying a paving terrace on a self-leveling pedestal

1/ Preparing the ground

With self-leveling paving terrace pedestals, site preparation is simplified, less costly and much faster. With self-leveling pedestals, you easily compensate for differences in levels. Preparing the land with crushed gravel is therefore the best way to prepare your land to accommodate your tiled terrace on self-leveling pedestals.

As for the choice of gravel, opt for a draining foundation by laying a layer of crushed stone of the 30/60 or 40/80 type.

Here is what you need for this preparation:

  • A cord
  • Stakes
  • A spirit level
  • A shovel
  • A tape measure
  • A mason's box screed
  • A geotextile film
  • Crushed gravel

As for the implementation, it is simple and rather fast:

  1. Dig the ground for 15 cm;
  2. Place a geotextile felt there to eradicate the growth of weeds and save you additional maintenance;
  3. Fill in the hole with a 15 cm layer of gravel;
  4. Compact everything.

2/ Lay the pedestals and the tiling pavings

The laying of the terrace pavings is done directly on the pedestals. No fixing is necessary which allows a great freedom. At any time, you can decide to enlarge or reduce your terrace by simply removing or adding pavings on the pedestals.

Laying a paving terrace on pedestals is done in just 4 steps, after having drawn up a layout plan. This includes the number of pedestals and their position. To help you, remember that it takes 1 pedestal per corner, i.e. 4 pedestals for a tiled paving . For large format pavings , it is recommended to reinforce the installation by adding 1 or 2 additional pedestals in the center of the paving by breaking the spacers.

Now, it’s time to pose:

  1. Position the pedestals directly on the ground, respecting the layout plan;
  2. Add an acoustic rubber to each of the pedestal heads;
  3. Lay the tiles, porcelain stoneware or wooden gratings against the spacers;
  4. Turn the gray nut to adjust the height of the pedestal to the desired level.

Accessories for laying a tiled terrace on a Jouplast pedestal

Technical characteristics

  • Complies with DTU 43.1
  • Load resistance greater than 1 ton
  • Frost and UV resistant
  • Flange diameter: 208 mm
  • Head diameter: 120 mm
  • Adjustable height: 155 to 245 mm
Product Details
JOU-IH155245DSN0000
3441290000955
1757 Items

Data sheet

Height
> 23 cm
From 12 to 15 cm
From 15 to 23 cm
Material
Polypropylene
Guarantee
2 years warranty
Origin
Manufactured in France
Conformity
Compliance with the DTU 43.1 and 51.4
Resistance
Resistant to acidic and basic solutions, atmospheric agents, temperatures between -30°C and +60°C
Load
Resists the test of crushing with a load superior in 1 ton
Brand
Jouplast
Type
Self-levelling
Adjustable height
155 to 245 mm
Qté lot
40
trad_lot
A batch of
OPMM
10
SH Code
39259010
Country of Origin
UE
Spacer thickness
3 mm
Best-price
Yes
Installation surface
Uneven/Inclined ground
Type of setting
Manual
Attachments
Download
16 other products in the same category: